My daughter was told to learn her times tables over the summer holidays, and I wanted to come up with a way of helping her remember, and a project for both of us to get involved in. As I have access to a live blues band, I thought a song would be the ideal thing, and we then made this silly video together...
As lead singer in my band Hot Cold Ground I'm hopeless at learning lyrics, so I always have a music stand with a big book of printed lyrics (and sometimes chords, but this IS a blues band, so not often!), which is just another bit of gear to carry around and set up.
I'm a long-time ebook reader, starting off reading on old Palm Pilot and Clié devices, before moving to cheap Chinese Android tablets, and recenly ending up with a Barnes & Noble Nook Simple Touch with Glowlight. This last device is perfect, with an endless battery life and backlight for night-time use.
So with a second Nook purchased the next stage is to see if I can convert my lyrics document to use on the reader. It does support .pdf but doesn't quite have the functionality I needed, like a contents list and one page-per-song. Here's how I did it.
The ideal source format to convert is HTML, and I use the excellent and free Calibre to do the conversion (more on that later). To create the source I used Dreamweaver, but there are loads of free HTML editors available. I did try using Word's 'Save As HTML-Filtered' but it adds a truckload of extra crap.
The key here is to avoid most of the tags that normally get generated. I'm not going to go into detail on HTML coding, again there are plenty of tutorials out there. All you really need is the <h1> tag and the <br/> line break tag. Avoid the <p> paragraph tag - it just causes confusion. If you're typing in your content then use Shift+Enter for line breaks rather than Enter on its own. You'll probably need to manually edit your code to add the tags to titles. I haven't explained this very well so here's an example:
<!DOCTYPE html PUBLIC "-//W3C//DTD XHTML 1.0 Transitional//EN" "http://www.w3.org/TR/xhtml1/DTD/xhtml1-transitional.dtd"> <html xmlns="http://www.w3.org/1999/xhtml"> <head> <meta http-equiv="Content-Type" content="text/html; charset=utf-8" /> <title>Hot Cold Ground setlist Oct 14</title> </head>
<body> <h1>Song One Title</h1> La la la verse 1 line 1<br /> La la la lyrics line 2<br /><br /> La la la verse 2 line 1<br /> La la la lyrics line 2<br/> <h1>Song Two Title</h1> etc etc </body> </html>
The top bit (up to </head>) is auto-generated by Dreamweaver, then the important bit is enclosed between <body> and </body> tags. Song titles (which the ePub will treat as chapters) need to have <h1> and </h1> either side of them, and each line of the song has <br/> (a self-escaping line break) at the end. Add a second one if you want a gap between verses.
Depending on how you've put the lines in (I did it by copy & paste from Publisher, which initially didn't work - I had to paste into Notepad first then copy again) you may end up with those silly paragraph <p> tags. You can leave them in if you want but it will indent first lines and waste space, so best to strip them out.
Still with me? Good. Now save that document and get Calibre installed. I'm not going to go through how to use the program, you can pick that up for yourself. But basically, you import the .htm file you've just made into Calibre, then run its conversion routine to convert it to ePub. The key part here is the Structure Detection, the first box dictates what Calibre will look for to make chapters, and it'll be your <h1> tags. You can use the wizard here, but basically it needs to say //h:h1. In the Table Of Contents section check the first box to force use of auto-generated Table Of Contents. Apart from adding a picture if you want, you're good to go. Stick the resulting converted file onto your eReader and that's it. It works nicely for me, with most songs on a single page (text size dependent, of course), and when you swipe or press each song starts on a fresh page.
Next is attaching the Nook to my mic stand. I've bodged something but it's not a permanent solution, so will probably end up buying a proper tablet holder.
My blues band Hot Cold Ground love to do 12-bar blues standards like this one, but we decided there were too many songs about places in America and thought we'd re-write the lyrics. Originally it was 'Route M6' but that wasn't local enough, so what we have here is the A146, which runs between Norwich in Norfolk and Lowestoft in Suffolk. Obviously if you know the area it's funnier. Feel free to share it with your friends.
Technical info for geeks - filmed on a Fuji S200EXR and a Casio EX-FS10 at a ridiculously low resolution. It was all filmed on the actual A146 in August 2013. The aerial views are from Google Earth (filmed with a camera in front of my screen as I don't want to buy Pro!) Edited in Adobe Premiere Pro CS6.
I recently bought a Pickmaster plectrum punch which is a great way of making your own free plectrums from unused plastic cards, and if (like me) you have access to a card printer, it can be used to make promotional plectrums for your band!
I experimented with the number of cards which can be punched from a single card, and got to a maximum of about 4 or 5 without too much trouble. However, if you're prepared to do a bit of extra cutting it's possible to make 6. Here's how.
Using this template on a standard sized card, cut it up into 6 pieces with sharp scissors:
Putting the pointy end of each piece into the Pickmaster, carefully line up the edges through the aperture, to avoid flat bits, and punch it out:
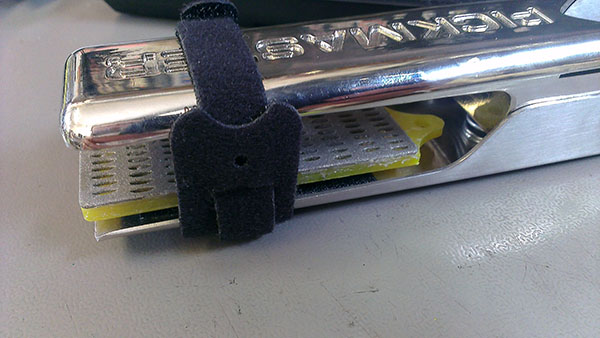
I've made a couple of very minor mods to my Pickmaster - a velcro tie to keep it shut, and a handy file (I think it was a knife-sharpener from the pound shop) to neaten up any slight rough edges. I notice the new Pickmasters have a bit of sandpaper glued to them in the same place, so I'd like to think I inspired that!
If you're into guitars (and you must be to be reading this), then have a look at my band's website - Hot Cold Ground Blues Band.
Done some testing in a ‘real’ environment now, and it’s a qualified success. It handles the FX send and return plus the channel control without a problem, even over 10m of cat5. However the disappointment is that as soon as I add the input from the guitar it squeaks and feeds back like a bastard. It just about copes over 1.5m but is unreliable over a longer run. If I had any electronics knowledge at all there’d probably be an explanation.
So I will be using it live, as I hope it’ll reduce setup/breakdown times. Pics of the final setup to follow
Actually there won't be any pics; I've had a radical rethink and gone all old-school, and I've got rid of the Vox Valvetronix and Boss pedalboard, in favour of a good old-fashioned valve (tube for American listeners) amplifier. I've built up a nice selection - main gigging amp is a 15-watt Laney Cub 12R, perfectly loud enough for the small pub/club gigs we play, plus it now has a 1976 vintage Celestion speaker in it for lovely warm bluesiness. I always carry a spare, which is a cheap Harley Benton GA15, although my friend and amp builder has tweaked it slightly, and it also has a Celestion speaker inside. For bigger, posher venues I use my precious and brand new Trevinitone TT18 18-watt, hand built by my friend. If I really want it loud, I also have a 1981 vintage Watkins (WEM) Dominator Mark4, which runs about 30 watts but has enough power to demolish small dwellings.
I just use a simple Ernie Ball volume pedal to switch between rhythm and lead sections, but otherwise plugged straight in. It's a lot less bother!
That said, I was very happy with the Cat5 solution, and did use it for gigging for a good few months. Gets some funny looks from those 'in the know', I can tell you.
Basically a Cat5 socket connected to 4 bits of guitar cable with jacks on the end, and;
and a Cat 5 socket connected directly to 4 jack sockets.
Item 1 gets connected to the amp sockets: input, FX send, FX return and footswitch
Item 2 (stage end) connected by short patches to input/output of the pedal, guitar connected to the corresponding input socket. For my test the amp I used had the wrong type of footswitch (momentary action rather than latching), so I had to plug the actual footswitch into the box. All I’m really doing here is making an extension cable, but just using the medium of Cat5 rather than multicore!
BUT… the damn thing works! No apparent crosstalk/interference/line hum/attenuation, even through a 5m patch cable. I’d call that a success. Next time, testing it in a proper band environment (rehearsal room)…
My stage guitar rig can be a bit of a bind when setting up and breaking down – it’s configured thus:
Guitar plugs straight into amp Effects send to Boss GT8 pedal Output from GT8 to effects return Additional cable from GT8 to footswitch allowing GT8 to switch channel
So all in all 4 cables involved. I wanted to try & cut down, initially by using a 4-pair multicore, then I could bring the guitar input down to the floor, keeping to a single cable run.
But multicore can be a bit expensive, and I’m an IT network technician with access to lots of Cat5 cable, so I started to wonder… Could I run the whole thing over Cat5 UTPnetwork cable, put a RJ45 socket at either end then all I’d need is a patch cable of the correct length.
No-one as far as I can see on several Googlings has tried it, so the only way to find out is to experiment.
Today I have this:
which is an old guitar lead soldered to one pair of a bit of Cat5, punched down onto a socket module
and this
which is Cat5 cable punched down into a module with a jack plug on the end
Plug in the lead to my guitar, plug the 2nd bit into an amp*, connect with a 5m patch lead and… bingo! It works! No apparent loss of signal strength or quality.
*I did use a proper amp to test – the mini-Marshall is just to show schematic!
Next step is to put in the other channels and see if there’s any crosstalk, hum or interference with the FX loop running backwards & forwards. Watch this space.